
作者: @怪盗kidou
Retrofit版本: 2.0.2

本文注目录:
- Retrofit入门
- Retrofit注解详解
- Gson与Converter
- RxJava与CallAdapter
- 自定义Converter
- 自定义CallAdapter
- 其它说明
前言
本文中的Retrofit均指代Retrofit2.0。
本文涉及到的代码以及测试使用的接口可在Github上找到。
测试接口服务器在 server 项目下,直接运行 RESTServer.main() 即可启动测试服务器,所面代码示例均使用该接口(接口地址 http://localhost:4567/ ).
当然你也可以自己借助 json-server 或 最新开源的Parse 搭建一个REST API,不过都需要安装Node.js,有兴趣的可以去试试。
接口列表:
| 地址 | 请求方法 | 参数 | 说明 |
|---|---|---|---|
| /blog | GET | page={page},sort=asc或desc | 分页获取Blog列表,每页10条 |
| /blog/{id} | GET | id | 获取指定ID的Blog |
| /blog | POST | {"author":"","title":"","content":""} | 创建一个新Blog |
| /blog/{id} | PUT | {"author":"","title":"","content":""} 中至少一个 | 修改Blog |
| /blog/{id} | DELETE | id | 删除一个Blog |
| /form | POST | 任意,最终以Json Object形式返回 | 用于测试Form表单,支持文件上传 |
| /headers | GET | showAll=true或false,默认false | 返回自定义请求头,all=true是显示全部 |
注:以上的接口的{id}和{page}均代表一个纯数字,/blog/{id} 可以用 /blog?id=XXX代替,page同理。
前面写了你应该知道的HTTP基础知识 介绍了HTTP的相关知识,不知道那些想了解Retrofit的同鞋是不是去看了Retrofit的官方教程,曾经我在你真的会用Gson吗?Gson使用指南(四) 中说当你了解了注解、反射、泛型、HTTP的内容只需要看一篇Retrofit的代码示例就可以轻松玩转Retrofit,不知道你玩转了没?
当然注解、反射、泛型的内容还没有写,Retrofit的内容却先来了!毕竟看懂Retrofit也只需要会使就行,你准备好了吗?
1、Retrofit入门
Retrofit 其实相当简单,简单到源码只有37个文件,其中22个文件是注解还都和HTTP有关,真正暴露给用户的类并不多,所以我看了一遍 官方教程 大多数情景就可以无障碍使用,如果你还没有看过,可以先去看看,虽然是英文,但代码才是最好的教程不是么?当然本篇文章会介绍得详细一点,不能写一篇水文,毕竟我给它命名为《你真的会用Retrofit2吗?Retrofit2完全教程》。
1.1、创建Retrofit实例
Retrofit retrofit = new Retrofit.Builder()
        .baseUrl("http://localhost:4567/")
        .build();
创建Retrofit实例时需要通过Retrofit.Builder,并调用baseUrl方法设置URL。
注: Retrofit2 的baseUlr 必须以 /(斜线) 结束,不然会抛出一个IllegalArgumentException,所以如果你看到别的教程没有以 / 结束,那么多半是直接从Retrofit 1.X 照搬过来的。
1.2、接口定义
以获取指定id的Blog为例:
public interface BlogService {
    @GET("blog/{id}")
    Call<ResponseBody> getBlog(@Path("id") int id);
}
注意,这里是interface不是class,所以我们是无法直接调用该方法,我们需要用Retrofit创建一个BlogService的代理对象。
BlogService service = retrofit.create(BlogService.class);
拿到代理对象之后,就可以调用该方法啦。
1.3、接口调用
Call<ResponseBody> call = service.getBlog(2);
// 用法和OkHttp的call如出一辙,
// 不同的是如果是Android系统回调方法执行在主线程
call.enqueue(new Callback<ResponseBody>() {
    @Override
    public void onResponse(Call<ResponseBody> call, Response<ResponseBody> response) {
        try {
            System.out.println(response.body().string());
        } catch (IOException e) {
            e.printStackTrace();
        }
    }

    @Override
    public void onFailure(Call<ResponseBody> call, Throwable t) {
        t.printStackTrace();
    }
});
打印结果:
{"code":200,"msg":"OK","data":{"id":2,"date":"2016-04-15 03:17:50","author":"怪盗kidou","title":"Retrofit2 测试2","content":"这里是 Retrofit2 Demo 测试服务器2"},"count":0,"page":0}
示例源码见 Example01.java
2、Retrofit注解详解
上面提到Retrofit 共22个注解,这节就专门介绍这22个注解,为帮助大家更好理解我将这22个注解分为三类,并用表格的形式展现出来,表格上说得并不完整,具体的见源码上的例子注释。
第一类:HTTP请求方法
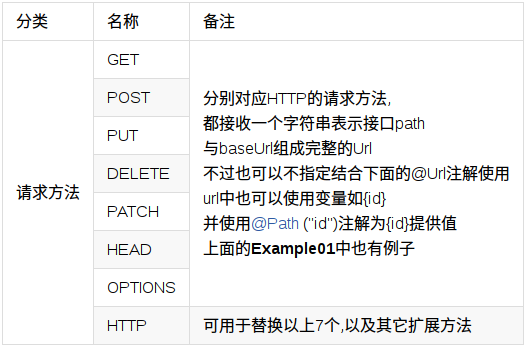
以上表格中的除HTTP以外都对应了HTTP标准中的请求方法,而HTTP注解则可以代替以上方法中的任意一个注解,有3个属性:method、path,hasBody,下面是用HTTP注解实现上面 Example01.java 的例子。
public interface BlogService {
    /**
     * method 表示请求的方法,区分大小写
     * path表示路径
     * hasBody表示是否有请求体
     */
    @HTTP(method = "GET", path = "blog/{id}", hasBody = false)
    Call<ResponseBody> getBlog(@Path("id") int id);
}
注:method 的值 retrofit 不会做处理,所以要自行保证其准确性,之前使用小写也可以是因为示例源码中的服务器不区分大小写,所以希望大家注意,感谢 @言過祺實 发现该问题。
示例源码见 Example02.java
第二类:标记类
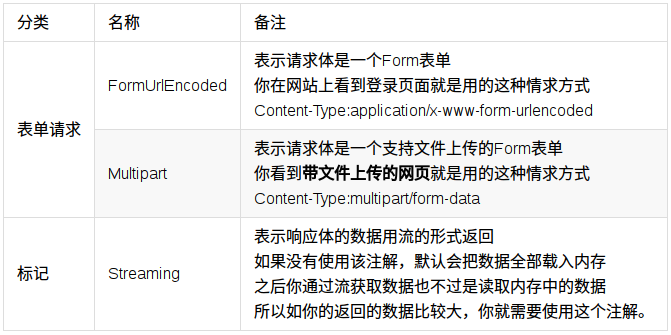
示例源码见 Example03.java
第三类:参数类
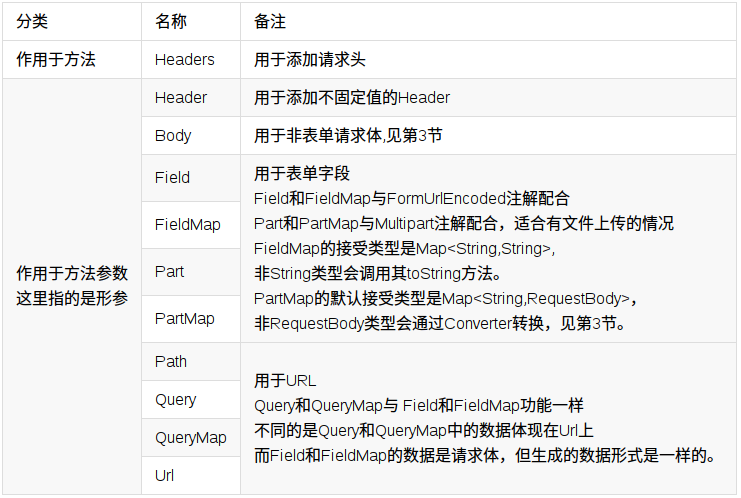
注1:{占位符}和PATH尽量只用在URL的path部分,url中的参数使用Query和QueryMap 代替,保证接口定义的简洁
注2:Query、Field和Part这三者都支持数组和实现了Iterable接口的类型,如List,Set等,方便向后台传递数组。
Call<ResponseBody> foo(@Query("ids[]") List<Integer> ids);
//结果:ids[]=0&ids[]=1&ids[]=2
Path 示例源码见 Example01.java
Field、FieldMap、Part和PartMap 示例源码见 Example03.java
Header和Headers 示例源码见 Example04.java
Query、QueryMap、Url 示例源码见 Example05.java
3、Gson与Converter
在默认情况下Retrofit只支持将HTTP的响应体转换换为ResponseBody,
这也是什么我在前面的例子接口的返回值都是 Call<ResponseBody>,
但如果响应体只是支持转换为ResponseBody的话何必要引用泛型呢,
返回值直接用一个Call就行了嘛,既然支持泛型,那说明泛型参数可以是其它类型的,
而Converter就是Retrofit为我们提供用于将ResponseBody转换为我们想要的类型,
有了Converter之后我们就可以写把我们的第一个例子的接口写成这个样子了:
public interface BlogService {
  @GET("blog/{id}")
  Call<Result<Blog>> getBlog(@Path("id") int id);
}
当然只改变泛型的类型是不行的,我们在创建Retrofit时需要明确告知用于将ResponseBody转换我们泛型中的类型时需要使用的Converter
引入Gson支持:
compile 'com.squareup.retrofit2:converter-gson:2.0.2'
通过GsonConverterFactory为Retrofit添加Gson支持:
Gson gson = new GsonBuilder()
      //配置你的Gson
      .setDateFormat("yyyy-MM-dd hh:mm:ss")
      .create();

Retrofit retrofit = new Retrofit.Builder()
      .baseUrl("http://localhost:4567/")
      //可以接收自定义的Gson,当然也可以不传
      .addConverterFactory(GsonConverterFactory.create(gson))
      .build();
示例源码见 Example06.java
这样Retrofit就会使用Gson将ResponseBody转换我们想要的类型。
这是时候我们终于可以演示如使创建一个Blog了!
@POST("blog")
Call<Result<Blog>> createBlog(@Body Blog blog);
被@Body注解的的Blog将会被Gson转换成RequestBody发送到服务器。
BlogService service = retrofit.create(BlogService.class);
Blog blog = new Blog();
blog.content = "新建的Blog";
blog.title = "测试";
blog.author = "怪盗kidou";
Call<Result<Blog>> call = service.createBlog(blog);
结果:
Result{code=200, msg='OK', data=Blog{id=20, date='2016-04-21 05:29:58', author='怪盗kidou', title='测试', content='新建的Blog'}, count=0, page=0}
示例源码见 Example07.java
如果你对Gson不熟悉可以参考我写的《你真的会用Gson吗?Gson使用指南》 系列。
4、RxJava与CallAdapter
说到Retrofit就不得说到另一个火到不行的库RxJava,网上已经不少文章讲如何与Retrofit结合,但这里还是会有一个RxJava的例子,不过这里主要目的是介绍使用CallAdapter所带来的效果。
第3节介绍的Converter是对于Call<T>中T的转换,而CallAdapter则可以对Call转换,这样的话Call<T>中的Call也是可以被替换的,而返回值的类型就决定你后续的处理程序逻辑,同样Retrofit提供了多个CallAdapter,这里以RxJava的为例,用Observable代替Call:
引入RxJava支持:
compile 'com.squareup.retrofit2:adapter-rxjava:2.0.2'
// 针对rxjava2.x(adapter-rxjava2的版本要 >= 2.2.0)
compile 'com.squareup.retrofit2:adapter-rxjava2:2.3.0'
通过RxJavaCallAdapterFactory为Retrofit添加RxJava支持:
Retrofit retrofit = new Retrofit.Builder()
      .baseUrl("http://localhost:4567/")
      .addConverterFactory(GsonConverterFactory.create())
      .addCallAdapterFactory(RxJavaCallAdapterFactory.create())
      // 针对rxjava2.x
      .addCallAdapterFactory(RxJava2CallAdapterFactory.create())
      .build();
接口设计:
public interface BlogService {
  @POST("/blog")
  Observable<Result<List<Blog>>> getBlogs();
}
使用:
BlogService service = retrofit.create(BlogService.class);
service.getBlogs(1)
  .subscribeOn(Schedulers.io())
  .subscribe(new Subscriber<Result<List<Blog>>>() {
      @Override
      public void onCompleted() {
        System.out.println("onCompleted");
      }

      @Override
      public void onError(Throwable e) {
        System.err.println("onError");
      }

      @Override
      public void onNext(Result<List<Blog>> blogsResult) {
        System.out.println(blogsResult);
      }
  });
结果:
Result{code=200, msg='OK', data=[Blog{id=1, date='2016-04-15 03:17:50', author='怪盗kidou', title='Retrofit2 测试1', content='这里是 Retrofit2 Demo 测试服务器1'},.....], count=20, page=1}
示例源码见 Example08.java
「20160608补充」:像上面的这种情况最后我们无法获取到返回的Header和响应码的,如果我们需要这两者,提供两种方案:
1、用Observable<Response<T>>``Observable<T> ,这里的Response指retrofit2.Response
2、用Observable<Result<T>> 代替Observable<T>,这里的Result是指retrofit2.adapter.rxjava.Result,这个Result中包含了Response的实例
5、自定义Converter
本节的内容是教大家实现在一简易的Converter,这里以返回格式为Call<String>为例。
在此之前先了解一下Converter接口及其作用:
public interface Converter<F, T> {
  // 实现从 F(rom) 到 T(o)的转换
  T convert(F value) throws IOException;

  // 用于向Retrofit提供相应Converter的工厂
  abstract class Factory {
    // 这里创建从ResponseBody其它类型的Converter,如果不能处理返回null
    // 主要用于对响应体的处理
    public Converter<ResponseBody, ?> responseBodyConverter(Type type, Annotation[] annotations,
    Retrofit retrofit) {
      return null;
    }

    // 在这里创建 从自定类型到ResponseBody 的Converter,不能处理就返回null,
    // 主要用于对Part、PartMap、Body注解的处理
    public Converter<?, RequestBody> requestBodyConverter(Type type,
    Annotation[] parameterAnnotations, Annotation[] methodAnnotations, Retrofit retrofit) {
      return null;
    }

    // 这里用于对Field、FieldMap、Header、Path、Query、QueryMap注解的处理
    // Retrfofit对于上面的几个注解默认使用的是调用toString方法
    public Converter<?, String> stringConverter(Type type, Annotation[] annotations,
    Retrofit retrofit) {
      return null;
    }

  }
}
我们要想从Call<ResponseBody> 转换为 Call<String> 那么对应的F和T则分别对应ResponseBody和String,我们定义一个StringConverter并实现Converter接口。
public static class StringConverter implements Converter<ResponseBody, String> {

  public static final StringConverter INSTANCE = new StringConverter();

  @Override
  public String convert(ResponseBody value) throws IOException {
    return value.string();
  }
}
我们需要一个Fractory来向Retrofit注册StringConverter
public static class StringConverterFactory extends Converter.Factory {

  public static final StringConverterFactory INSTANCE = new StringConverterFactory();

  public static StringConverterFactory create() {
    return INSTANCE;
  }

  // 我们只关实现从ResponseBody 到 String 的转换,所以其它方法可不覆盖
  @Override
  public Converter<ResponseBody, ?> responseBodyConverter(Type type, Annotation[] annotations, Retrofit retrofit) {
    if (type == String.class) {
      return StringConverter.INSTANCE;
    }
    //其它类型我们不处理,返回null就行
    return null;
  }
}
使用Retrofit.Builder.addConverterFactory向Retrofit注册我们StringConverterFactory:
Retrofit retrofit = new Retrofit.Builder()
      .baseUrl("http://localhost:4567/")
      // 如是有Gson这类的Converter 一定要放在其它前面
      .addConverterFactory(StringConverterFactory.create())
      .addConverterFactory(GsonConverterFactory.create())
      .build();
注:addConverterFactory是有先后顺序的,如果有多个ConverterFactory都支持同一种类型,那么就是只有第一个才会被使用,而GsonConverterFactory是不判断是否支持的,所以这里交换了顺序还会有一个异常抛出,原因是类型不匹配。
只要返回值类型的泛型参数就会由我们的StringConverter处理,不管是Call<String>还是Observable<String>
有没有很简单?如果你有其它的需求处理的就自己实现吧。
示例源码见 Example09.java
6、自定义CallAdapter
本节将介绍如何自定一个CallAdapter,并验证是否所有的String都会使用我们第5节中自定义的Converter。
先看一下CallAdapter接口定义及各方法的作用:
public interface CallAdapter<T> {

  // 直正数据的类型 如Call<T> 中的 T
  // 这个 T 会作为Converter.Factory.responseBodyConverter 的第一个参数
  // 可以参照上面的自定义Converter
  Type responseType();

  <R> T adapt(Call<R> call);

  // 用于向Retrofit提供CallAdapter的工厂类
  abstract class Factory {
    // 在这个方法中判断是否是我们支持的类型,returnType 即Call<Requestbody>和`Observable<Requestbody>`
    // RxJavaCallAdapterFactory 就是判断returnType是不是Observable<?> 类型
    // 不支持时返回null
    public abstract CallAdapter<?> get(Type returnType, Annotation[] annotations,
    Retrofit retrofit);

    // 用于获取泛型的参数 如 Call<Requestbody> 中 Requestbody
    protected static Type getParameterUpperBound(int index, ParameterizedType type) {
      return Utils.getParameterUpperBound(index, type);
    }

    // 用于获取泛型的原始类型 如 Call<Requestbody> 中的 Call
    // 上面的get方法需要使用该方法。
    protected static Class<?> getRawType(Type type) {
      return Utils.getRawType(type);
    }
  }
}
了解了CallAdapter的结构和其作用之后,我们就可以开始自定义我们的CallAdapter了,本节以CustomCall<String>为例。
在此我们需要定义一个CustomCall,不过这里的CustomCall作为演示只是对Call的一个包装,并没有实际的用途。
public static class CustomCall<R> {

  public final Call<R> call;

  public CustomCall(Call<R> call) {
    this.call = call;
  }

  public R get() throws IOException {
    return call.execute().body();
  }
}
有了CustomCall,我们还需要一个CustomCallAdapter来实现 Call<T> 到 CustomCall<T>的转换,这里需要注意的是最后的泛型,是我们要返回的类型。
public static class CustomCallAdapter implements CallAdapter<CustomCall<?>> {

  private final Type responseType;

  // 下面的 responseType 方法需要数据的类型
  CustomCallAdapter(Type responseType) {
    this.responseType = responseType;
  }

  @Override
  public Type responseType() {
    return responseType;
  }

  @Override
  public <R> CustomCall<R> adapt(Call<R> call) {
    // 由 CustomCall 决定如何使用
    return new CustomCall<>(call);
  }
}
提供一个CustomCallAdapterFactory用于向Retrofit提供CustomCallAdapter:
public static class CustomCallAdapterFactory extends CallAdapter.Factory {
  public static final CustomCallAdapterFactory INSTANCE = new CustomCallAdapterFactory();

  @Override
  public CallAdapter<?> get(Type returnType, Annotation[] annotations, Retrofit retrofit) {
    // 获取原始类型
    Class<?> rawType = getRawType(returnType);
    // 返回值必须是CustomCall并且带有泛型
    if (rawType == CustomCall.class && returnType instanceof ParameterizedType) {
      Type callReturnType = getParameterUpperBound(0, (ParameterizedType) returnType);
      return new CustomCallAdapter(callReturnType);
    }
    return null;
  }
}
使用addCallAdapterFactory向Retrofit注册CustomCallAdapterFactory
Retrofit retrofit = new Retrofit.Builder()
      .baseUrl("http://localhost:4567/")
      .addConverterFactory(Example09.StringConverterFactory.create())
      .addConverterFactory(GsonConverterFactory.create())
      .addCallAdapterFactory(CustomCallAdapterFactory.INSTANCE)
      .build();
注: addCallAdapterFactory与addConverterFactory同理,也有先后顺序。
示例源码见 Example10.java
7、其它说明
7.1 Retrofit.Builder
前面用到了 Retrofit.Builder 中的baseUrl、addCallAdapterFactory、addConverterFactory、build方法,还有callbackExecutor、callFactory、client、validateEagerly这四个方法没有用到,这里简单的介绍一下。
| 方法 | 用途 |
|---|---|
| callbackExecutor(Executor) |
指定Call.enqueue时使用的Executor,所以该设置只对返回值为Call的方法有效 |
| callFactory(Factory) |
设置一个自定义的okhttp3.Call.Factory,那什么是Factory呢?OkHttpClient就实现了okhttp3.Call.Factory接口,下面的client(OkHttpClient)最终也是调用了该方法,也就是说两者不能共用 |
| client(OkHttpClient) |
设置自定义的OkHttpClient,以前的Retrofit版本中不同的Retrofit对象共用同OkHttpClient,在2.0各对象各自持有不同的OkHttpClient实例,所以当你需要共用OkHttpClient或需要自定义时则可以使用该方法,如:处理Cookie、使用stetho 调式等 |
| validateEagerly(boolean) |
是否在调用create(Class)时检测接口定义是否正确,而不是在调用方法才检测,适合在开发、测试时使用 |
7.2 Retrofit的Url组合规则
从上面不能难看出以下规则:
- 如果你在注解中提供的url是完整的url,则url将作为请求的url。
- 如果你在注解中提供的url是不完整的url,且不以 / 开头,则请求的url为baseUrl+注解中提供的值
- 如果你在注解中提供的url是不完整的url,且以 / 开头,则请求的url为baseUrl的主机部分+注解中提供的值
7.3 Retrofit提供的Converter
| Converter | Gradle依赖 |
|---|---|
| Gson | com.squareup.retrofit2:converter-gson:2.0.2 |
| Jackson | com.squareup.retrofit2:converter-jackson:2.0.2 |
| Moshi | com.squareup.retrofit2:converter-moshi:2.0.2 |
| Protobuf | com.squareup.retrofit2:converter-protobuf:2.0.2 |
| Wire | com.squareup.retrofit2:converter-wire:2.0.2 |
| Simple XML | com.squareup.retrofit2:converter-simplexml:2.0.2 |
| Scalars | com.squareup.retrofit2:converter-scalars:2.0.2 |
7.4 Retrofit提供的CallAdapter:
| CallAdapter | Gradle依赖 |
|---|---|
| guava | com.squareup.retrofit2:adapter-guava:2.0.2 |
| Java8 | com.squareup.retrofit2:adapter-java8:2.0.2 |
| rxjava | com.squareup.retrofit2:adapter-rxjava:2.0.2 |
7.5 关于源码
看到这儿可能有小伙伴要问为什么源码没有把类拆分到单独的文件,命名也不能体现其用途,这里主要是因为方便大家看源码,而不是将注意力放在反复跳转上,另一方面也是因为同一个例子中不可避免的使用其它小节要介绍的内容,所以就直接用了ExampleXX的形式,不过在项目中千万不要使用这种方式,一定要好好命名,做到见名知意。
结语
其它本博客的内容早就已经完成好了,但由于当时HTTP、反射、注解的博客一篇也没有写,所以一直没有发,期间也有不少的博主写了Retrofit2的博文,不过呢没有自定义相关的内容也没有对各个注解进行详解,所以我还是决定发出来帮助一下那此对Retrofit2无从下手同鞋。
这次Retrofit2的内容就到这里啦,下次再见。